- 前言
- 1. 自动安装相关组件
- 2. 编译安装 MariaDB 10.10.2
- 3. 编译安装 Redis 7.07
- 4. 编译安装 Nginx 1.23.3
- 5. 编译安装 PHP 8.4
- 5.1 编译安装 phpredis 模块
- 5.2 编译安装 php-imagick 模块
- 5.3 编译安装 php-ssh2 模块
- 5.4 编译安装 php-swoole 模块
- 6.5 编译安装 php-geospatial 模块
- 5.6 编译安装 php-lzf 模块
- 5.7 编译安装 php-csv 模块
- 5.8 编译安装 php-uuid 模块
- 5.9 编译安装 php-kafka模块
- 5.10 编译安装 php-memcache 模块
- 5.11 编译安装 php-memcached 模块
- 5.12 编译安装 php-yaml 模块
- 5.13 编译安装 php-bsdiff 模块
- 5.14 编译安装 php-xdebug 模块
- 5.15 编译安装 php-uploadprogress 模块
- 5.16 编译安装 php-pecl_http 模块
- 5.17 编译安装 php-php-amqp 模块
- 5.18 编译安装 php-xhprof 模块
- 5.19 编译安装 pthreads 模块
- 6. 编译安装 proftpd 1.3.8
前言
Centos最新的为 Stream 9,记录下在上面记录下安装过程,其它版本也大同小异,所有安装的软件都为最新版本,编译时尽量把平时能用到的组件都给编译进去,方便以后使用时做减法。
首先更新系统
dnf update -y目录说明:
/data # 数据目录
/data/www # WEB文件目录
/data/redis # redis数据目录
/data/mariadb # mariadb数据目录
/data/source # 源代码编译目录
1. 自动安装相关组件
1.1 一键脚本生成源(推荐):
curl -LsS https://r.mariadb.com/downloads/mariadb_repo_setup | bash -s -- --mariadb-server-version=11.81.2 centos自动安装
https://downloads.mariadb.org/mariadb/repositories/
1.3 刷新软件源并安装:
dnf clean all
dnf makecache
dnf install -y MariaDB-server MariaDB-client
2. 编译安装 MariaDB 10.10.2
官方安装说明:https://mariadb.com/kb/en/compiling-mariadb-from-source/
手动安装相关组件
yum install -y ncurses-devel libevent libevent-devel libxml2-devel openssl-devel bison cmake gcc-c++到 https://mariadb.org/download 获取最新下载地址
wget https://mirrors.aliyun.com/mariadb//mariadb-10.10.2/source/mariadb-10.10.2.tar.gz
tar -zxvf mariadb-10.10.2.tar.gz
cd mariadb-10.10.2/
# 完整安装:
cmake -DCMAKE_INSTALL_PREFIX=/usr/local/mariadb \
-DMYSQL_DATADIR=/data/mariadb \
-DSYSCONFDIR=/data/mariadb/ \
-DMYSQL_USER=mariadb \
-DWITH_EXTRA_CHARSETS=all \
-DWITH_EXTRA_CHARSETS=complex \
-DDEFAULT_CHARSET=utf8mb4 \
-DDEFAULT_COLLATION=utf8mb4_general_ci \
-DENABLE_ASSEMBLER=1 \
-DWITH_EXTRA_CHARSETS=complex \
-DENABLE_THREAD_SAFE_CLIENT=1 \
-DWITH_BIG_TABLES=1 \
-DWITH_PLUGIN_ARIA=1 \
-DWITH_ARIA_TMP_TABLES=1 \
-DWITH_SSL=bundled \
-DWITH_MAX=1 \
-DWITH_TOKUDB_STORAGE_ENGINE=1\
-DWITH_SPIDER_STORAGE_ENGINE=1 \
-DWITH_LIBEVENT=bundled \
-DPLUGIN_PLUGIN_FILE_KEY_MANAGEMENT=NO \
-DENABLE_LOCAL_INFILE=1 \
-DWITH_READLINE=1 \
-DWITH_SSL=system \
-DWITH_ZLIB=system \
-DWITH_LIBWRAP=0
make -j4
make install

# 设置 my.cnf
nano /etc/my.cnf
[server]
[client]
default-character-set=utf8mb4[mysqld]
skip-grant-tables
bind-address=127.0.0.1
datadir=/data/mariadb
socket=/var/lib/mysql/mysql.sock
character_set_server=utf8mb4
collation-server=utf8mb4_general_cislow_query_log=on
long_query_time=2
slow_query_log_file=/data/mariadb/slow_query_log.log
log_queries_not_using_indexes=onevent_scheduler=on
query_cache_type=on
query_cache_strip_comments=on
query_cache_size=64M
query_cache_limit=2Mtmp_table_size=256M
max_heap_table_size=256M
table_open_cache=512
open_files_limit=8192init_connect='SET NAMES utf8mb4'
# 设置启动脚本
nano /etc/systemd/system/mariadb.service
# 增加以下内容
[Unit]
Description=MariaDB server and services
After=syslog.target
After=network.target[Service]
Type=simple
User=mariadb
Group=mariadb
ExecStart=/usr/local/mariadb/bin/mysqld
TimeoutSec=300
PrivateTmp=false[Install]
WantedBy=multi-user.target
# 增加 mariadb 用户
useradd -s /sbin/nologin mariadb
# 创建数据库目录
mkdir /data/mariadb
chown mariadb:mariadb /data/mariadb
# 创建数据库文件
/data/source/mariadb-10.10.2/scripts/mysql_install_db --datadir=/data/mariadb --user=mariadb --group=mariadb --skip-name-resolve
# 启动mariadb服务
systemctl daemon-reload
systemctl start mariadb
# 我不知道新版的 mariadb root 初始化密码是什么,到处都找不到,只能硬砸了
# 修改 my.cnf,在 [mysqld] 下增加 skip-grant-tables
systemctl restart mariadb

/usr/local/mariadb/bin/mysql -h 127.0.0.1 -u root
MariaDB [(none)]> use mysql;
MariaDB [mysql]> flush privileges; //刷新权限
MariaDB [mysql]> alter user 'root'@'localhost' identified by '123456'; # 改密码,数字部分自由修改
MariaDB [mysql]> quit;
# 修改 my.cnf,注释掉 skip-grant-tables
systemctl restart mariadb
# 安全设置,现在 root 密码为 123456 了,看心情改吧
/usr/local/mariadb/bin/mysql_secure_installation -h 127.0.0.1
# 设置开机启动 mariadb
systemctl enable mariadb
# mariadb 安装完成
3. 编译安装 Redis 7.07
下载地址:https://redis.io/docs/getting-started/installation/install-redis-from-source/
# 安装依赖包
dnf install systemd-develwget https://download.redis.io/redis-stable.tar.gz tar zxvf redis-stable.tar.gz cd redis-stable/make CFLAGS="-march=x86-64" USE_SYSTEMD=yes -j4 install # 增加 redis 用户 useradd -s /sbin/nologin redis mkdir /data/redis cp redis.conf /etc/ chown redis:redis /data/redis -R nano /etc/redis.conf #修改配置文件
daemonize yes
dir /data/redis
# 设置启动脚本
nano /etc/systemd/system/redis.service
# 增加以下内容
[Unit]
Description=Redis persistent key-value database
After=network.target[Service]
ExecStart=/usr/local/bin/redis-server /etc/redis.conf --supervised systemd
ExecReload=/bin/kill -s HUP $MAINPID
ExecStop=/usr/local/bin/redis-cli -p 6379 shutdown
Type=notify
User=redis
Group=redis[Install]
WantedBy=multi-user.target
# 修改系统配置文件
/etc/sysctl.conf
# 在结尾增加
vm.overcommit_memory = 1
具体原因请看:《内存分配策略:overcommit_memory》
# 使修改结果立即生效
sysctl -p
# 启动服务
systemctl daemon-reload
systemctl start redis
systemctl enable redis
# Redis 安装完成4. 编译安装 Nginx 1.23.3
4.1 安装相关依赖包
# 安装相关组件
dnf install libunwind-devel libtool autoconf automake git pcre-devel perl-ExtUtils-Embed

# 增加 www 用户
useradd -s /sbin/nologin www

# 安装 gperftools 优化nginx内存管理
git clone https://github.com/gperftools/gperftools.git
cd gperftools
./autogen.sh
./configure --enable-frame-pointers --enable-libunwind
make
make install

# 下载nginx源代码
wget http://nginx.org/download/nginx-1.23.3.tar.gz
tar zxvf nginx-1.23.3.tar.gz
4.2 下载 nginx 第三方模块
# --------------- 根据需要下载对应的模块 ---------------
# 下载 nginx-accesskey 模块
git clone https://github.com/nczy520/nginx-accesskey.git
# 下载 nginx-rtmp 模块
git clone https://github.com/arut/nginx-rtmp-module.git
# 下载 nginx-module-vts 模块
git clone https://github.com/vozlt/nginx-module-vts.git
# 下载 nginx-upload-module 模块
git clone https://github.com/fdintino/nginx-upload-module.git
# 下载 nginx-push-stream-module 模块
git clone https://github.com/wandenberg/nginx-push-stream-module.git
# 下载 nginx-vod-module 模块
git clone https://github.com/kaltura/nginx-vod-module.git
# 下载 headers-more-nginx-module 模块
git clone https://github.com/openresty/headers-more-nginx-module.git
# 下载 echo-nginx-module 模块
git clone https://github.com/openresty/echo-nginx-module.git
# 下载 nginx-ts-module 模块
git clone https://github.com/arut/nginx-ts-module.git
# 下载 ngx_image_thumb 模块
dnf install gd-devel
git clone https://github.com/oupula/ngx_image_thumb.git
# 下载 traffic-accounting-nginx-module 模块
git clone https://github.com/Lax/traffic-accounting-nginx-module.git
# 下载 nginx-video-thumbextractor-module 模块
git clone https://github.com/wandenberg/nginx-video-thumbextractor-module.git
# 下载 nginx-secure-token-module 模块
git clone https://github.com/kaltura/nginx-secure-token-module.git
4.3 编译 nginx
./configure --user=www --group=www \
--prefix=/usr/local/nginx \
--sbin-path=/usr/local/sbin/nginx \
--conf-path=/usr/local/etc/nginx/nginx.conf \
--error-log-path=/var/log/nginx/error.log \
--http-log-path=/var/log/nginx/access.log \
--pid-path=/dev/shm/nginx.pid \
--with-http_ssl_module \
--with-http_realip_module \
--with-http_addition_module \
--with-http_sub_module \
--with-http_dav_module \
--with-http_gzip_static_module \
--with-http_stub_status_module \
--with-http_perl_module \
--with-google_perftools_module \
--with-http_v2_module \
--with-http_mp4_module \
--with-http_gunzip_module \
--with-http_gzip_static_module \
--with-http_auth_request_module \
--with-http_random_index_module \
--with-http_secure_link_module \
--with-mail \
--with-http_auth_request_module \
--with-http_degradation_module \
--with-google_perftools_module \
--add-module=../nginx-module-vts \
--add-module=../nginx-accesskey \
--add-module=../nginx-rtmp-module \
--add-module=../nginx-upload-module \
--add-module=../nginx-push-stream-module \
--add-module=../nginx-vod-module \
--add-module=../headers-more-nginx-module \
--add-module=../echo-nginx-module \
--add-module=../nginx-ts-module \
--add-module=../ngx_image_thumb \
--add-module=../traffic-accounting-nginx-module \
--add-module=../nginx-video-thumbextractor-module \
--add-module=../nginx-secure-token-module

make -j4
make install
4.4 问题处理
如果在make时出现了错误:
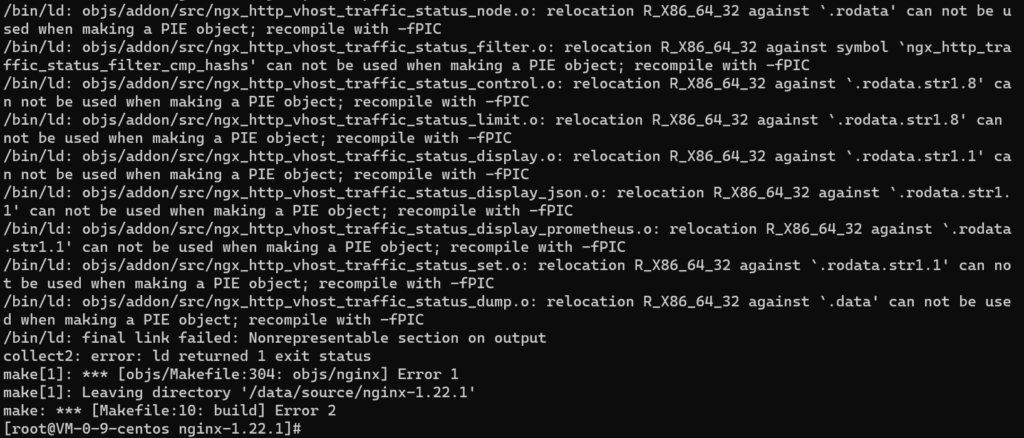
先 make clean
再 configure,接着编辑: nginx-1.23.3/objs/Makefile
在 CFLAGS = -pipe -O -W -Wall -Wpointer-arith -Wno-unused-parameter -Werror -g 最后加上 -fPIC
CFLAGS = -pipe -O -W -Wall -Wpointer-arith -Wno-unused-parameter -Werror -g -fPIC
记得 -fPIC 后面要留一个空格!再重新 make
4.5 安装后配置
# 将 nginx/etc 软链接 /etc
ln -s /usr/local/etc/nginx/ /etc/nginx

# 设置 ld.conf
nano /etc/ld.so.conf.d/local.conf
/usr/local/lib
/usr/local/lib64

ldconfig -v

# 在 /etc/nginx/conf.d/ 内配置好需要的网站
# 设置启动脚本
nano /etc/systemd/system/nginx.service
# 增加以下内容
[Unit]
Description=The nginx HTTP and reverse proxy server
After=network.target remote-fs.target nss-lookup.target[Service]
Type=forking
PIDFile=/dev/shm/nginx.pid
ExecStartPre=/usr/bin/rm -f /run/nginx.pid
ExecStartPre=/usr/local/sbin/nginx -t
ExecStart=/usr/local/sbin/nginx
ExecReload=/bin/kill -s HUP $MAINPID
KillSignal=SIGQUIT
TimeoutStopSec=5
KillMode=mixed
PrivateTmp=true[Install]
WantedBy=multi-user.target
# 启动 nginx
systemctl start nginx
systemctl enable nginx
5. 编译安装 PHP 8.4
# 安装相关组件
yum install gd-devel systemd-devel sqlite-devel bzip2-devel curl-devel libpng-devel libjpeg-devel freetype-devel libxslt-devel gmp-devel libwebp-devel# 安装组件 oniguruma-devel
git clone https://github.com/kkos/oniguruma.git
cd oniguruma
./autogen.sh
./configure --prefix=/usr
make -j4
make install
# 下载 php 8.2 源代码
wget https://www.php.net/distributions/php-8.4.5.tar.gz
tar zxvf php-8.4.5.tar.gz
cd php-8.4.5
./configure --prefix=/usr/local/php \
--with-config-file-path=/usr/local/php/etc \
--with-config-file-scan-dir=/usr/local/php/etc/conf.d \
--with-iconv --with-zlib --enable-xml \
--with-xsl --with-jpeg \
--with-webp --with-freetype \
--with-curl --enable-bcmath \
--enable-shmop --enable-mbregex \
--enable-sysvshm --enable-sysvmsg --enable-sysvsem \
--enable-mbstring --with-openssl \
--with-bz2 --with-pdo-mysql \
--with-pdo-sqlite --enable-pcntl \
--enable-sockets --with-pear \
--with-mysqli --with-pdo-mysql \
--enable-ftp --enable-fpm \
--with-fpm-user=www --with-fpm-group=www \
--enable-opcache --enable-exif \
--enable-gd --enable-pcntl --enable-pdo \
--enable-bcmath --enable-mbregex \
--enable-shmop --enable-soap \
--enable-sysvsem --enable-cli \
--enable-intl --enable-calendar \
--enable-static --enable-ftp \
--with-gettext --with-gmp \
--enable-shmop --enable-ipv6 \
--with-system-ciphers \
--enable-sigchild \
--enable-zts
make -j4
make install
cp php.ini-production /usr/local/php/etc/php.ini
cd /usr/local/php/etc
cp php-fpm.conf.default php-fpm.conf
nano php-fpm.conf
# 修改内容daemonize = yes
cd /usr/local/php/etc/php-fpm.d
cp www.conf.default www.conf

# 设置启动脚本
nano /etc/systemd/system/php-fpm.service
# 增加以下内容
[Unit]
Description=The PHP8.2 FastCGI Process Manager
After=syslog.target network.target[Service]
Type=simple
#User=www
#Group=www
PIDFile=/dev/shm/php-fpm.pid
ExecStart=/usr/local/php/sbin/php-fpm --nodaemonize --fpm-config /usr/local/php/etc/php-fpm.conf
ExecReload=/bin/kill -USR2 $MAINPID
PrivateTmp=true[Install]
WantedBy=multi-user.target
# 启动 php-fpm
systemctl start php-fpm
systemctl enable php-fpm
5.1 编译安装 phpredis 模块
# 下载源码
git clone https://github.com/phpredis/phpredis.git
cd phpredis
/usr/local/php/bin/phpize
./configure --with-php-config=/usr/local/php/bin/php-config
make USE_TCMALLOC=yes -j4 && make install

# 编辑PHP配置文件
nano /usr/local/php/etc/php.ini
# 在最后加上
extension=redis.so
# 重启 php-fpm
systemctl restart php-fpm
5.2 编译安装 php-imagick 模块
# 下载地址:https://download.imagemagick.org/archive/
# 安装 ImageMagick
wget https://download.imagemagick.org/archive/ImageMagick.tar.gz
tar -zxvf ImageMagick.tar.gz
cd ImageMagick-7.1.0-57
./configure --prefix=/usr/local/imagemagick
make -j4
make install

# 下载地址:http://pecl.php.net/package/imagick
# 安装Imagick
wget http://pecl.php.net/get/imagick-3.8.0.tgz
tar -zxvf imagick-3.8.0.tgz
cd imagick-3.8.0/
/usr/local/php/bin/phpize
./configure --with-php-config=/usr/local/php/bin/php-config --with-imagick=/usr/local/imagemagick
make -j4
make install

# 编辑PHP配置文件
nano /usr/local/php/etc/php.ini
# 在最后加上
extension=imagick.so
# 重启 php-fpm
systemctl restart php-fpm
5.3 编译安装 php-ssh2 模块
# 下载地址:https://libssh2.org
# 安装 libssh2
wget https://libssh2.org/download/libssh2-1.10.0.tar.gz
tar zxvf libssh2-1.10.0.tar.gz
cd libssh2-1.10.0
./configure
make -j4
make install

# 下载地址:http://pecl.php.net/package/ssh2
# 安装 ssh2
wget http://pecl.php.net/get/ssh2-1.3.1.tgz
tar zxvf ssh2-1.3.1.tgz
/usr/local/php/bin/phpize
./configure --with-php-config=/usr/local/php/bin/php-config
make
make install

# 编辑PHP配置文件
nano /usr/local/php/etc/php.ini
# 在最后加上
extension=ssh2.so
# 重启 php-fpm
systemctl restart php-fpm
5.4 编译安装 php-swoole 模块
# 安装 swoole
git clone https://github.com/swoole/swoole-src
/usr/local/php/bin/phpize
./configure --with-php-config=/usr/local/php/bin/php-config \
--enable-openssl --enable-sockets --enable-mysqlnd \
--enable-trace-log --enable-debug-log
make -j4
make install

# 编辑PHP配置文件
nano /usr/local/php/etc/php.ini
# 在最后加上
extension=swoole.so
# 重启 php-fpm
systemctl restart php-fpm
6.5 编译安装 php-geospatial 模块
# 下载地址 http://pecl.php.net/package/geospatial
wget http://pecl.php.net/get/geospatial-0.3.2.tgz
tar zxvf geospatial-0.3.2.tgz
cd geospatial-0.3.2
/usr/local/php/bin/phpize
./configure --with-php-config=/usr/local/php/bin/php-config
make -j4
make install

# 编辑PHP配置文件
nano /usr/local/php/etc/php.ini
# 在最后加上
extension=geospatial.so
# 重启 php-fpm
systemctl restart php-fpm
5.6 编译安装 php-lzf 模块
# 下载地址 http://pecl.php.net/package/lzf
wget http://pecl.php.net/get/LZF-1.7.0.tgz
tar zxvf LZF-1.7.0.tgz
cd LZF-1.7.0
/usr/local/php/bin/phpize
./configure --with-php-config=/usr/local/php/bin/php-config
make -j4
make install

# 编辑PHP配置文件
nano /usr/local/php/etc/php.ini
# 在最后加上
extension=lzf.so
# 重启 php-fpm
systemctl restart php-fpm
5.7 编译安装 php-csv 模块
# 下载地址 http://pecl.php.net/package/CSV
wget http://pecl.php.net/get/CSV-0.4.2.tgz
tar zxvf CSV-0.4.2.tgz
cd CSV-0.4.2
/usr/local/php/bin/phpize
./configure --with-php-config=/usr/local/php/bin/php-config
make -j4
make install

# 编辑PHP配置文件
nano /usr/local/php/etc/php.ini
# 在最后加上
extension=csv.so
# 重启 php-fpm
systemctl restart php-fpm
5.8 编译安装 php-uuid 模块
# 安装依赖包
dnf install libuuid-devel
# 下载地址 http://pecl.php.net/package/uuid
wget http://pecl.php.net/get/uuid-1.2.0.tgz
tar zxvf uuid-1.2.0.tgz
cd uuid-1.2.0
/usr/local/php/bin/phpize
./configure --with-php-config=/usr/local/php/bin/php-config
make -j4
make install

# 编辑PHP配置文件
nano /usr/local/php/etc/php.ini
# 在最后加上
extension=uuid.so
# 重启 php-fpm
systemctl restart php-fpm
5.9 编译安装 php-kafka模块
# 安装依赖包
git clone https://github.com/edenhill/librdkafka.git
cd librdkafka
./configure
make -j4 && make install
# 下载地址
git <span class="token keyword">clone</span> https<span class="token punctuation">:</span><span class="token comment">//github.com/arnaud-lb/php-rdkafka.git</span>
cd php-rdkafka
/usr/local/php/bin/phpize
./configure --with-php-config=/usr/local/php/bin/php-config
make -j4
make install

# 编辑PHP配置文件
nano /usr/local/php/etc/php.ini
# 在最后加上
extension=rdkafka.so
# 重启 php-fpm
systemctl restart php-fpm
5.10 编译安装 php-memcache 模块
# 下载地址:http://pecl.php.net/package/memcache
wget http://pecl.php.net/get/memcache-8.0.tgz
tar zxvf memcache-8.0.tgz
cd memcache-8.0
/usr/local/php/bin/phpize
./configure --with-php-config=/usr/local/php/bin/php-config
make -j4
make install

# 编辑PHP配置文件
nano /usr/local/php/etc/php.ini
# 在最后加上
extension=memcache.so
# 重启 php-fpm
systemctl restart php-fpm
5.11 编译安装 php-memcached 模块
# 安装依赖包
dnf install flex memcached
# 安装 libmemcached
git clone https://github.com/awesomized/libmemcached.git
cd libmemcached
cmake .
make -j4 && make install
# 下载地址:http://pecl.php.net/package/memcached
wget http://pecl.php.net/get/memcached-3.2.0.tgz
tar zxvf memcached-3.2.0.tgz
cd memcached-3.2.0
/usr/local/php/bin/phpize
./configure --with-php-config=/usr/local/php/bin/php-config --disable-memcached-sasl
make -j4
make install

# 编辑PHP配置文件
nano /usr/local/php/etc/php.ini
# 在最后加上
extension=memcached.so
# 重启 php-fpm
systemctl restart php-fpm
5.12 编译安装 php-yaml 模块
# 安装 libyaml
git clone https://github.com/yaml/libyaml.git
cd libyaml
./bootstrap
./configure
make -j4 && make install
# 下载地址:http://pecl.php.net/package/yaml
wget http://pecl.php.net/get/yaml-2.2.2.tgz
tar zxvf yaml-2.2.2.tgz
cd yaml-2.2.2
/usr/local/php/bin/phpize
./configure --with-php-config=/usr/local/php/bin/php-config
make -j4
make install

# 编辑PHP配置文件
nano /usr/local/php/etc/php.ini
# 在最后加上
extension=yaml.so
# 重启 php-fpm
systemctl restart php-fpm
5.13 编译安装 php-bsdiff 模块
# 下载地址:https://github.com/deminy/php-bsdiff
git clone https://github.com/deminy/php-bsdiff.git
cd php-bsdiff
/usr/local/php/bin/phpize
./configure --with-php-config=/usr/local/php/bin/php-config
make -j4
make install

# 编辑PHP配置文件
nano /usr/local/php/etc/php.ini
# 在最后加上
extension=bsdiff.so
# 重启 php-fpm
systemctl restart php-fpm
5.14 编译安装 php-xdebug 模块
# 下载地址:http://pecl.php.net/package/Xdebug
wget http://pecl.php.net/get/xdebug-3.2.0.tgz
tar zxvf xdebug-3.2.0.tgz
cd xdebug-3.2.0
/usr/local/php/bin/phpize
./configure --with-php-config=/usr/local/php/bin/php-config
make -j4
make install

# 编辑PHP配置文件
nano /usr/local/php/etc/php.ini
# 在最后加上
extension=xdebug.so
# 重启 php-fpm
systemctl restart php-fpm
5.15 编译安装 php-uploadprogress 模块
# 下载地址:https://github.com/php/pecl-php-uploadprogress
git clone https://github.com/php/pecl-php-uploadprogress.git
cd pecl-php-uploadprogress/
/usr/local/php/bin/phpize
./configure --with-php-config=/usr/local/php/bin/php-config
make -j4 && make install

# 编辑PHP配置文件
nano /usr/local/php/etc/php.ini
# 在最后加上
extension=uploadprogress.so
# 重启 php-fpm
systemctl restart php-fpm
5.16 编译安装 php-pecl_http 模块
# 安装依赖包 http://pecl.php.net/get/raphf-2.0.1.tgz
wget http://pecl.php.net/get/raphf-2.0.1.tgz
tar zxvf raphf-2.0.1.tgz
cd raphf-2.0.1/
/usr/local/php/bin/phpize
./configure --with-php-config=/usr/local/php/bin/php-config
make -j4 && make install
# 需要启用扩展才能进行下一步编辑PHP配置文件
nano /usr/local/php/etc/php.ini
# 在最后加上
extension=raphf.so
# 重启 php-fpm
systemctl restart php-fpm

# 下载地址:http://pecl.php.net/package/pecl_http
wget http://pecl.php.net/get/pecl_http-4.2.3.tgz
tar zxvf pecl_http-4.2.3.tgz
cd pecl_http-4.2.3/
/usr/local/php/bin/phpize
./configure --with-php-config=/usr/local/php/bin/php-config
make -j4 && make install

# 编辑PHP配置文件
nano /usr/local/php/etc/php.ini
# 在最后加上
extension=http.so
# 重启 php-fpm
systemctl restart php-fpm
5.17 编译安装 php-php-amqp 模块
# 安装依赖包
git clone https://github.com/alanxz/rabbitmq-c.git
cd rabbitmq-c
cmake . -DCMAKE_INSTALL_PREFIX=/usr/local/rabbitmq-c
make -j4 && make install

# 下载地址:https://github.com/php-amqp/php-amqp
git clone https://github.com/php-amqp/php-amqp.git
cd php-amqp/
/usr/local/php/bin/phpize
./configure --with-php-config=/usr/local/php/bin/php-config --with-amqp --with-librabbitmq-dir=/usr/local/rabbitmq-c
make -j4 && make install

# 编辑PHP配置文件
nano /usr/local/php/etc/php.ini
# 在最后加上
extension=amqp.so
# 重启 php-fpm
systemctl restart php-fpm
5.18 编译安装 php-xhprof 模块
# 下载地址:https://github.com/longxinH/xhprof
git clone https://github.com/longxinH/xhprof.git
cd xhprof/extension/
/usr/local/php/bin/phpize
./configure --with-php-config=/usr/local/php/bin/php-config --enable-xhprof
make -j4 && make install # 编辑PHP配置文件 nano /usr/local/php/etc/php.ini # 在最后加上extension=xhprof.so
# 重启 php-fpm
systemctl restart php-fpm
5.19 编译安装 pthreads 模块
# 下载地址:https://github.com/krakjoe/pthreads
git clone https://github.com/krakjoe/pthreads.git
cd pthreads
/usr/local/php/bin/phpize
./configure --with-php-config=/usr/local/php/bin/php-config
make -j4 && make install # 编辑PHP配置文件 nano /usr/local/php/etc/php.ini # 在最后加上extension=pthreads.so
# 重启 php-fpm
systemctl restart php-fpm
6. 编译安装 proftpd 1.3.8
编译安装的 proftpd 包括 mariadb 插件、mysql 虚拟用户和 mysql 限额,篇幅很长,这里单独起了个文章:《编译安装 proftpd 并带 MariaDB 虚拟用户和限额》


 :bi...
文章评论